How to Wire Your E-Bike Controller
Share
How to Wire Your E-Bike Controller
If you're looking to upgrade or repair your electric bike (e-bike), understanding how to wire your e-bike controller is essential. Whether you're a seasoned e-bike enthusiast or a beginner, this guide will walk you through the process step by step.
Why Wiring Your E-Bike Controller Matters
The e-bike controller plays a crucial role in determining the performance and functionality of your electric bike. It's the brain behind your e-bike motor, battery, and throttle, making it essential to ensure it's properly wired for optimal performance.
Improper wiring can lead to various issues, such as reduced power, poor speed control, or even safety hazards. By following the correct wiring procedure, you can enjoy a smoother and safer e-bike riding experience.
Tools and Materials You'll Need
Before we dive into the wiring process, gather the following tools and materials:
- E-Bike Controller: Make sure you have the appropriate controller for your e-bike model.
- Wire Strippers: To strip the insulation from wires.
- Soldering Iron and Solder: For secure connections.
- Heat Shrink Tubing: To protect and insulate connections.
- Wire Connectors: Various types may be needed, such as bullet connectors or XT60 connectors.
- Multimeter: To test your connections and ensure proper voltage.
- Wiring Diagram: Obtain a wiring diagram specific to your e-bike model.
Step-by-Step Wiring Guide
- Safety First: Disconnect the battery from your e-bike to avoid any accidental electrical shock.
- Refer to the Wiring Diagram: This is your roadmap. Study it carefully to understand the wire colours and connections required for your specific e-bike.
- Prepare the Wires: Cut and strip the wires as needed, following the specifications in your wiring diagram.
-
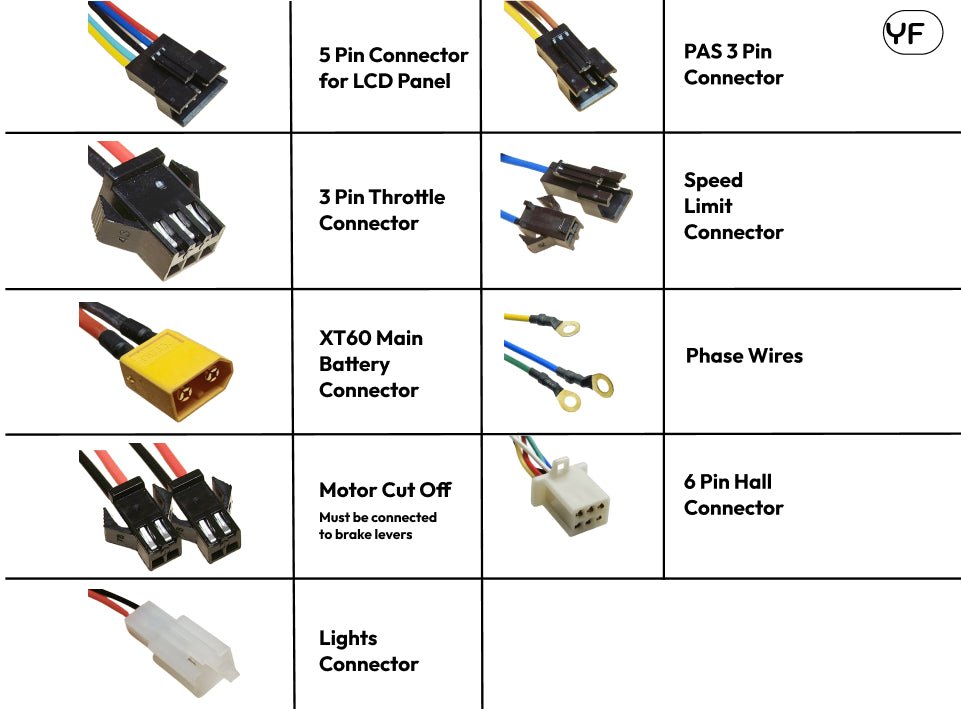
Connect the Battery: Start by connecting the wires from the battery to the controller. Typically, you'll have positive (red) and negative (black) wires. Use appropriate connectors and ensure a snug fit.
|
Connection |
Wire Colour |
Connector Type |
|
Battery Positive |
Red |
XT60 Connector |
|
Battery Negative |
Black |
XT60 Connector |
-
Connect the Motor: Attach the motor wires to the controller. These wires often come in different colours, so refer to your wiring diagram for proper matching.
|
Connection |
Wire Colour |
Connector Type |
|---|---|---|
|
Motor Phase A |
Green |
Bullet Connector |
|
Motor Phase B |
Blue |
Bullet Connector |
|
Motor Phase C |
Yellow |
Bullet Connector |
- Throttle and Brake Levers: Connect the throttle and brake levers to the controller. Again, consult your wiring diagram for colour-coding.
- Hall Sensor Wires (if applicable): Some e-bike motors have Hall sensors. Connect these wires according to your diagram.
- Secure the Connections: Use right connectors and heat shrink tubing to secure all the connections. This ensures a reliable and safe electrical connection.
Testing Your Wiring
After completing the wiring process, it's crucial to test your e-bike before taking it out for a ride. Reconnect the battery and use a multimeter to check the voltage across key connections. Ensure that the throttle, brakes, and motor respond as expected.
Conclusion
Wiring your e-bike controller is a fundamental skill for any e-bike enthusiast. It can unlock the full potential of your electric bike and keep it running smoothly. Always refer to your specific wiring diagram and take your time to make secure connections. With the right tools and careful attention, you can enjoy a safe and enjoyable e-bike riding experience.
Remember if you're unsure about any step in the wiring process, consult a professional or seek guidance from your e-bike manufacturer. Happy riding!


5 comments
I bought a trashed Vilano core e-bike no battery just frame and rear motor wheel I want to get it to work . I bought a 36v battery that has xt60 connect.as well as a throttle for the bars . The problem (besides wanting to repair this bike lol) is that the bike comes with 9 pin connectors .what do I need to get to have this Frankenstein come to life ? Thanks
Troubles with e-scooters and e-bikes with brushless controllers
Ik heb een Windgoo B20 én nú héb ik èèn andere controller gekocht Brainpower Motor Controller volts 36 48V Power 350W. Máár ik zou óók graag m’n nieuwe CD_S866 Display óp m’n Windgoo B20 wíllèn aansluiten !
Kán iemand mij aub uitleggen hoe ik de juiste kabels aansluit vóórdát ik állés ópbláás ?!?! Bvd mvg Frank Grinwis
I have a battery which is oblong and has 6 connections it has + positive, 1&2when under these 3&4 then on the right – negative do I just connect the red and black on the controller to poss and neg on the battery? But what is 1,2,3,4 for?
Hi I was wondering if you could possibly help me I have the EnGwe t14 ebike I am having to put another controller in the ebike as I received it from a friend but has no controller but he has cut all plugs off wiring but all wires and colours are still there I have a new controller can you possibly help me through
Thanks